
How to Get Great Results With Product Photography
High-quality product photography enhances every buyer touchpoint from your website to social media and beyond. Whether you are just starting out or need to improve upon existing images, there are many tips and tricks for getting great results.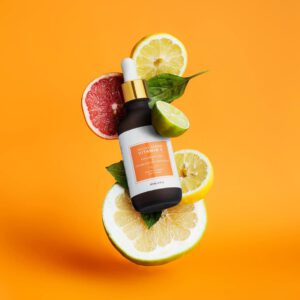
Perfect lighting is essential for beautiful product photos. A tripod is a must to help keep the camera steady and ensure a sharp photo.
When taking product photos, the background is a key element that can make or break the image. The best backgrounds are neutral, and simple, and allow the product to take center stage. This is especially important for e-commerce products, which need to be clearly visible and easily recognizable in a high-resolution image.
White backgrounds are a popular option for product photography because they provide a clean and simple background that can make the product stand out and create a sense of depth. They also require fewer post-production edits and can help to highlight the details of the product. However, white backgrounds can be boring and monotonous, so it’s important to add a touch of creativity to your images. A little experimentation can go a long way in making your photos stand out from the competition.
Colored product photography backgrounds are another great option for brands that want to communicate a specific mood or atmosphere. You can choose a solid color that complements your product or brand, or you can try something more creative like a textured backdrop or even a floral pattern. It’s important to note, though, that colors can have different emotional associations with shoppers around the world, so be sure to test them out beforehand.
If you’re not comfortable with taking pictures against a plain background, product photo editing services like Soona offer professional background removal and clipping path services. This can make your photos look a lot more polished and professional without sacrificing any of the details you’ve worked so hard to capture.
Lighting
Whether you’re selling products online or in your storefront, high-quality product photography can set you apart from similar businesses. In addition to creating a sense of value, compelling images help potential customers understand how a product will work in their lives. This will make them more likely to buy from your business, as opposed to a competitor who offers the same product at a lower price point.
Lighting is one of the most important components of any product photo shoot. Using the right techniques and equipment can ensure that your images look their best, no matter what you’re shooting.
There are several different types of lighting used in product photography, including key lights, fill lights, and backlights. A key light is a bright, direct source of light that illuminates the product from the front. This is often paired with a fill light, which is placed on the other side of the subject to provide more illumination. A backlight is a low-intensity light that illuminates the product from the rear or behind. Using a backlight can create shadows that create dimension in your image.
The lighting you choose can also affect the color of your image, and it’s important to experiment with different options before choosing the best one for your product. A professional product photographer will know how to use a range of lighting modifiers, such as softboxes, reflectors, honeycomb grids, snoots, and scrims.
A tripod is an essential piece of product photography equipment. It helps reduce blurriness in your photos, ensuring that they’re clear and crisp. It’s also useful for maintaining consistency in your images and reducing post-photography editing time. A tripod is particularly useful for a product photo shoot, as it allows you to keep the camera steady when taking multiple shots of the same product.
Props
Props add a sense of context to product photos. They help to create a mood and atmosphere that entices customers to purchase the product. They can also provide a deeper understanding of the products’ purpose and functionality. Props come in all shapes and sizes, from small accessories to large backdrops. They can be as simple as a piece of fruit or as complex as a set of fairy lights. A photographer must know how and when to use these props to create the perfect shot.
The type of props used depends on the type of product. For example, a photographer shooting a board game may want to include a table and chairs to give the viewer a sense of scale. Alternatively, a scented candle might benefit from being paired with a matching tin or bowl of water. Other props that are commonly used in product photography include books, magazines, trays, and plants.
It’s important to choose the right props for a product photo. Using too many props can overcrowd the image and distract viewers’ attention from the main subject. Props should also be well-matched in terms of size, color, and texture.
For example, a tray can be a great prop for food product photography because it adds depth and visual contrast to the photograph. It can also be used to highlight a specific aspect of the food or beverage being photographed.
Another popular prop for product photography is a block or plinth. These are pieces of furniture that elevate a product, creating a more aesthetically pleasing composition and eliminating background clutter. They are available in a variety of materials and can be purchased or rented from most photographic studios.
Angles
There are a variety of angles that can be used to capture product photos. Each angle provides a different perspective on your product, and shoppers are often more drawn to certain perspectives than others.
Front Angle: This shot is taken from eye-level and is ideal for products with a lot of details, such as electronics or jewellery. It can also be a great way to highlight the product’s packaging design or branding.
Side Angle: This angle is great for showing off a product’s depth and texture. It is especially useful for products with a unique shape or design. The back angle is also important for displaying the back of the product, which can be helpful if you’re looking to showcase a specific feature or detail.
Top Angle: A high angle, or birds-eye view, can add context for shoppers and provide more information on the size of a product. It can be challenging to shoot at a precise angle, so it’s important to mark your camera position before you begin shooting. You can also use a mini tripod to reduce camera shake.
Diagonal Composition: A diagonal composition is a great way to show off two sides of a product in one image. It’s also a great choice for large items like furniture or appliances.
Using the right product photography techniques can make your online store stand out from competitors and encourage shoppers to purchase. To take quality product photographs, be sure to set up a clean work space and choose the right lighting. Then, experiment with different angles and photo editing software to find the best combination of elements for your products. With a little practice, you’ll be taking high-quality product photos in no time!
Detail
Product photos are more than eye-catching — they’re also essential for attracting and nurturing customers at each stage of their decision-making journey. Slick, quality product images instantly engender trust and create desire. They’re also critical for boosting brand recognition and accelerating store conversions and retention rates.
In just 50 milliseconds, shoppers will process a product image and decide whether to continue browsing — so it’s vital that your product photographs capture attention quickly. In addition to demonstrating product quality and communicating the spirit of your brand, great product photography will highlight unique features and details, which help consumers compare products and choose the right one for them.
Achieving a crisp, clean look requires the correct lighting and tools. Using strip softboxes, for example, will ensure that the product retains its shape and form — even when shot on a white background. Similarly, a color checker will help you achieve the perfect white balance in your images.
It’s also important to take a mix of in-context and product-only shots. This helps customers envision how the product might fit into their lifestyle and adds to the feeling of ownership, which is key for driving sales. For instance, if you sell backpacks, show a scene of someone carrying the backpack on a hike or at a classy event, as well as an in-context photo showing the backpack close-up to highlight features like zippers and mesh pockets.